Table of Contents
Tunnel Client Setup
To enter the tunnel section:
- Login
- Click on the
TUNNELSsection on the right-hand side of the screen
Client Setup
To add a client, you'll need the server information you'll be connecting to. In this example, VE7NA is the server and VA7FI is the client.
VE7NA sent this information to VA7FI:
Wireguard Client connection details for VA7FI-hAPac3-1

Name: VA7FI-hAPac3-1
Wireguard key: [a long string of characters]
Network: 172.31.112.92:5525
Server address: rr.ve7na.ca
Note that the tunnel information provided may also be formatted like this (since the babel-20250925-a02d4ce3 nightly build):
Wireguard Client connection details for VA7FI-hAPac3-1

Remote server name: rr.ve7na.ca
Wireguard key: [a long string of characters]
Network:Port: 172.31.112.92:5525
To enter this information
- select
Wireguard Clientand click the +: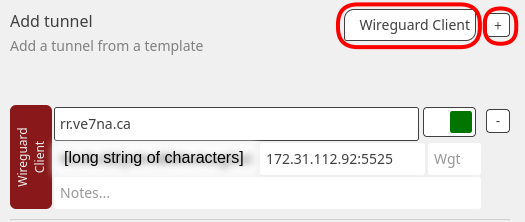
- click
Done - select
Commit


Toggle Switches
 The boxes on the right of the tunnel configuration sections are “Toggle Switches” that control the state of the tunnel connection. There are three possible states:
- Disabled: A tunnel is configured but the system will not try to connect it.
- Enabled and Not Connected: A tunnel has been configured, and it is available to be connected. The system will attempt to make this connection (after saving and committing your changes).
- Enabled and Connected: A tunnel connection is configured and active.
If you are setting up your first tunnel, you will want it to be in one of the Enabled states. It will show up initially in white (the Enabled and Not Connected state), and automatically turn to green when it makes a connection.